
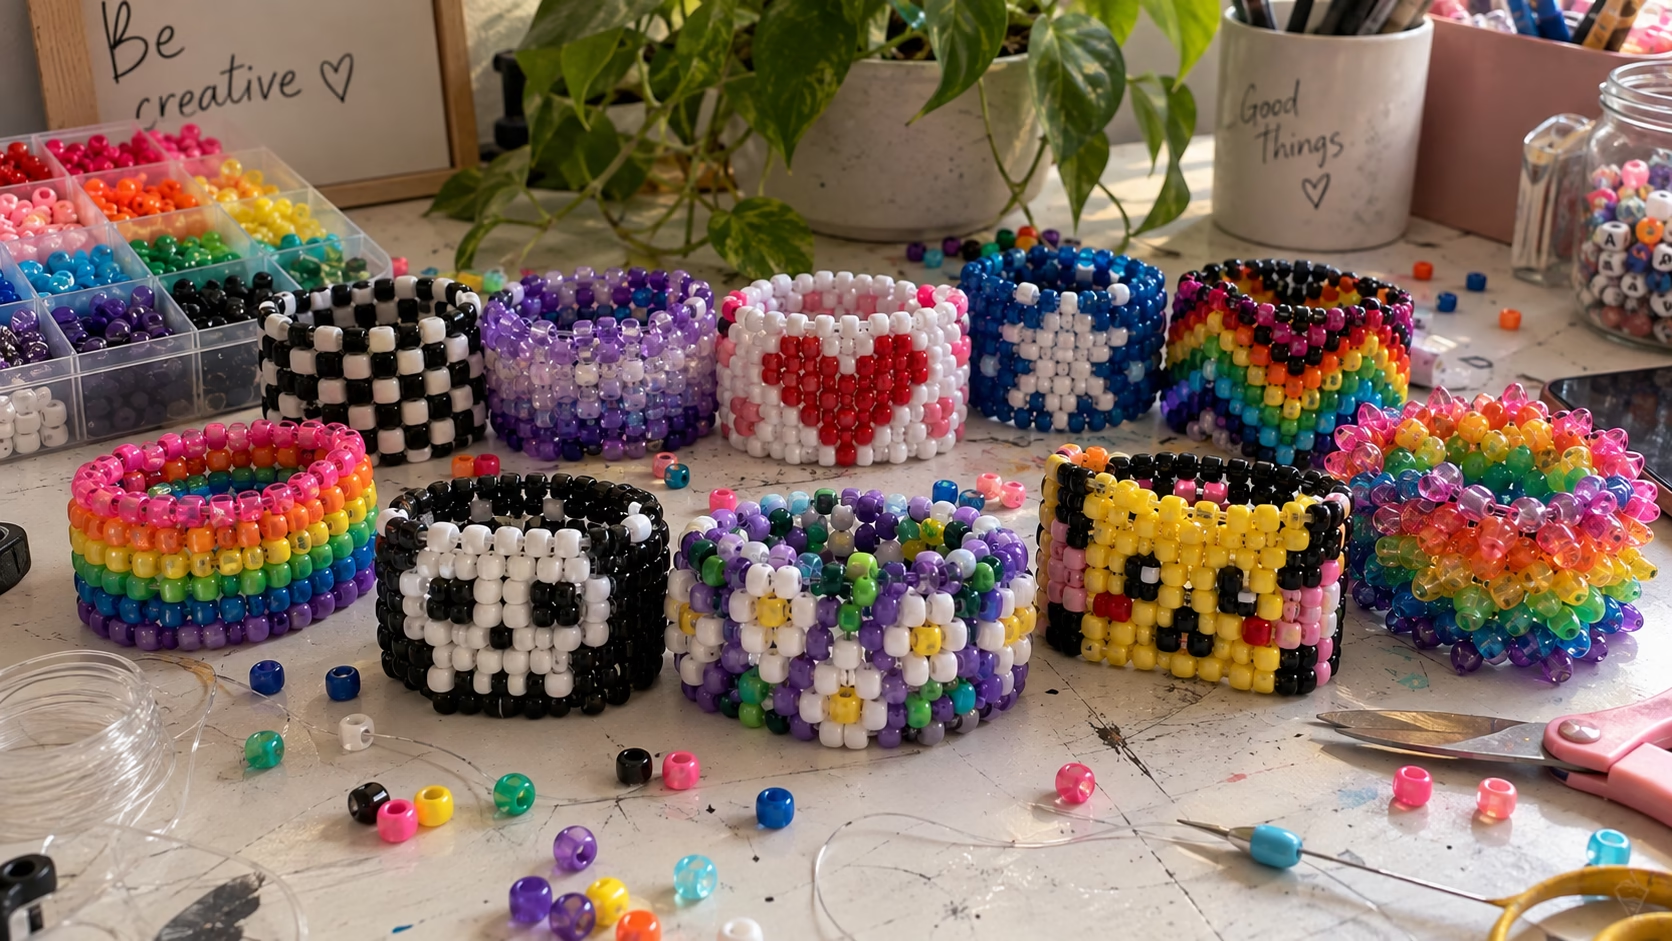
If you’ve ever seen a colorful kandi cuff and wondered how people make those wide, beaded bracelets, the good news is that you don’t need to be an expert to get started.
Kandi cuffs are made by weaving pony beads onto elastic cord to create a wider bracelet that can feature stripes, hearts, flowers, chevrons, characters, and other colorful designs. Once you understand the basic stitch, you can start with a simple pattern and gradually work your way toward more detailed cuffs.
In this guide, I’ll walk you through 10 easy kandi cuff patterns, the supplies you’ll need, how to read a pattern grid, and a few tips that make the process much easier when you’re starting out.
Key Takeaways
- Most kandi cuffs use pony beads and stretch elastic cord.
- The ladder stitch is a useful starting point for flat kandi cuffs.
- Simple stripe and repeating patterns are easiest for beginners.
- Pattern grids make more detailed designs easier to follow.
- Start with 2–4 rows before moving to wider cuffs.
- Don’t pull the elastic too tightly while weaving, or the cuff won’t flex comfortably.
- Give yourself extra cord so you have enough room to finish and secure the cuff.
What Are Kandi Cuffs?
Kandi cuffs are wide, multi-row bracelets made by threading pony beads onto elastic cord and weaving the rows together. Unlike a simple single-strand stretch bracelet, a cuff creates a broader surface where you can build patterns and designs.
One of the things I like most about kandi cuffs is how customizable they are. You can keep the design as simple as a few color stripes or use a pattern grid to create hearts, flowers, skulls, characters, and other pixel-style images.
If you’ve already tried making stretch bracelets, a kandi cuff is a fun next step because you’re adding multiple rows and pattern-making to the process.
Supplies You’ll Need

You only need a handful of supplies to make most of the kandi cuff patterns in this guide.
| Supply | What It’s For |
|---|---|
| Pony beads | Standard 6 × 9 mm beads in your chosen colors |
| Stretch elastic cord | About 0.5–1 mm thick for a flexible cuff |
| Beading needle | Makes threading through multiple beads easier |
| Scissors | For cutting the elastic cord |
| Tape or binder clip | Helps hold your work while you bead |
Helpful extras: A bead tray or mat keeps your colors organized, while graph paper can help you sketch a pattern before you start. You can also use a digital kandi pattern designer if you’d rather plan your design on screen.
How to Read a Kandi Cuff Pattern
If you’ve never used a kandi pattern grid before, it can look confusing at first. Once you understand what the squares represent, though, it becomes much easier.
- Each square represents one bead. The color of the square tells you which bead to use.
- Rows determine the height. More rows create a wider cuff.
- Columns determine the length of the repeating design.
- Follow the pattern one row at a time. Keep checking your bead colors as you work.

My tip: Keep your pattern beside you and check off each row as you complete it. This is especially helpful once you start working with several colors.
10 Easy Kandi Cuff Patterns for Beginners
I’ve arranged these from simple repeating designs to more detailed patterns. If you’re completely new to kandi cuffs, I’d start with one of the first three before moving on to character or 3D designs.
1. Rainbow Stripe Kandi Cuff
Best for: Absolute beginners
Difficulty: Beginner
Rows: 4
Pattern type: Multi-stitch
Time: About 30 minutes
Approximate beads: 80
If this is your first kandi cuff, a simple rainbow stripe pattern is a great place to start. There are no complicated pictures to follow, so you can focus on learning the basic weaving technique and keeping your rows even.
What You’ll Need
- Pony beads in rainbow colors
- Stretch elastic cord
- Beading or yarn needle
- Scissors
Rainbow Stripe Pattern
For this beginner-friendly version, you’ll make a 4-row cuff with 20 beads around the base, for approximately 80 beads total.
The base row should contain an even number of beads for this type of cuff. Each additional row is woven into the spaces between the beads of the row underneath.
Pattern Grid
Each square represents one bead.
| Row | Pattern |
|---|---|
| 1 | 🔴 🟠 🟡 🟢 🔵 🟣 🔴 🟠 🟡 🟢 🔵 🟣 🔴 🟠 🟡 🟢 🔵 🟣 🔴 🟠 |
| 2 | 🔴 🟠 🟡 🟢 🔵 🟣 🔴 🟠 🟡 🟢 🔵 🟣 🔴 🟠 🟡 🟢 🔵 🟣 🔴 🟠 |
| 3 | 🔴 🟠 🟡 🟢 🔵 🟣 🔴 🟠 🟡 🟢 🔵 🟣 🔴 🟠 🟡 🟢 🔵 🟣 🔴 🟠 |
| 4 | 🔴 🟠 🟡 🟢 🔵 🟣 🔴 🟠 🟡 🟢 🔵 🟣 🔴 🟠 🟡 🟢 🔵 🟣 🔴 🟠 |
Color key:
🔴 Red
🟠 Orange
🟡 Yellow
🟢 Green
🔵 Blue
🟣 Purple
How to Make It
- Cut your elastic. Leave plenty of extra cord so you have enough to finish and tie the cuff.
- String the first row. Add 20 beads to your elastic in the order shown in the pattern.
- Form the first row into a circle. Bring the ends together and secure the starting row.
- Add the second row. Add each new bead while weaving the cord through the appropriate bead from the previous row.
- Continue with rows 3 and 4. Follow the color pattern carefully as you work around the cuff.
- Check your pattern. Before finishing, make sure the colors line up, and the rows are even.
- Finish the cuff. Bring the ends together, secure the elastic with a strong knot, then thread the remaining cord through a few nearby beads before trimming the excess.
💡 Beginner Tip
Don’t pull the elastic too tightly while you’re working. Keep a little flexibility in the cuff so the beads can sit naturally and the finished bracelet can stretch comfortably around your wrist.
Why Start With This Pattern?
The rainbow stripe design is simple enough that you can concentrate on learning the basic cuff technique instead of worrying about a complicated picture. Once you’ve made one, you’ll be more comfortable moving on to patterns with hearts, flowers, characters, and other designs.
Ready for your first cuff? Grab your beads and start with the rainbow!
2. Checkerboard Kandi Cuff 🖤🤍

Best for: Beginners ready for a repeating pattern
Difficulty: Beginner
Rows: 4
Pattern type: Multi-stitch
Time: About 35 minutes
Approximate beads: 80
If you’ve already tried a simple stripe cuff, the checkerboard pattern is a fun next step. It uses just two colors, but alternating them creates a much more structured design.
Black and white gives you the classic checkerboard look, but you can use any two contrasting colors—pink and purple, blue and yellow, or even two pastel shades.
What You’ll Need
- Pony beads in two contrasting colors
- Stretch elastic cord
- Beading or yarn needle
- Scissors
Checkerboard Pattern
For this beginner-friendly version, you’ll make a 4-row cuff with 20 beads around the base, for approximately 80 beads total.
The two colors alternate throughout the pattern. To create the checkerboard effect, the color order switches on each new row.
Pattern Grid
Each square represents one bead.

Tip: You can replace black and white with any two colors you like. Choose colors with enough contrast that the checkerboard pattern remains easy to see.
How to Make It
- Cut your elastic. Leave plenty of extra cord so you have enough to finish and tie the cuff.
- String the first row. Add 20 beads, alternating your two colors according to Row 1 of the pattern.
- Form the first row into a circle. Bring the ends together and secure the starting row.
- Add the second row. Follow Row 2, switching the color order so each new bead creates the checkerboard pattern.
- Continue with rows 3 and 4. Keep alternating the color order as shown in the pattern.
- Check your pattern. Look around the cuff to make sure the colors alternate consistently, and the checkerboard pattern is forming evenly.
- Finish the cuff. Bring the ends together, secure the elastic with a strong knot, then thread the remaining cord through a few nearby beads before trimming the excess.
💡 Beginner Tip
Keep checking the color order every few beads. With only two colors, it’s easy to accidentally add two of the same color next to each other and throw off the pattern.
Try Different Color Combinations
The checkerboard pattern doesn’t have to be black and white. Try:
- 💗 Pink + white
- 💜 Purple + pink
- 💙 Blue + yellow
- 💚 Green + white
- 🧡 Orange + purple
- 🌈 Two contrasting neon colors
The basic idea is simply Color A → Color B → Color A → Color B, then switch the starting color on the next row. Alternating colors across successive rows is what creates the checkerboard effect
3. Ombre / Gradient Kandi Cuff

Best for: Color lovers
Difficulty: Beginner–Intermediate
Rows: 5
Pattern type: Multi-stitch
Time: About 40 minutes
Approximate beads: 100
An ombre kandi cuff creates a gradual color change by using different shades of the same color family. Instead of switching between completely different colors, you move from a lighter shade to a darker shade as you build the cuff.
Purple works especially well for this design, but you can create the same effect with pink, blue, green, orange, or almost any color you love.
What You’ll Need
- Pony beads in 5 shades of the same color
- Stretch elastic cord
- Beading or yarn needle
- Scissors
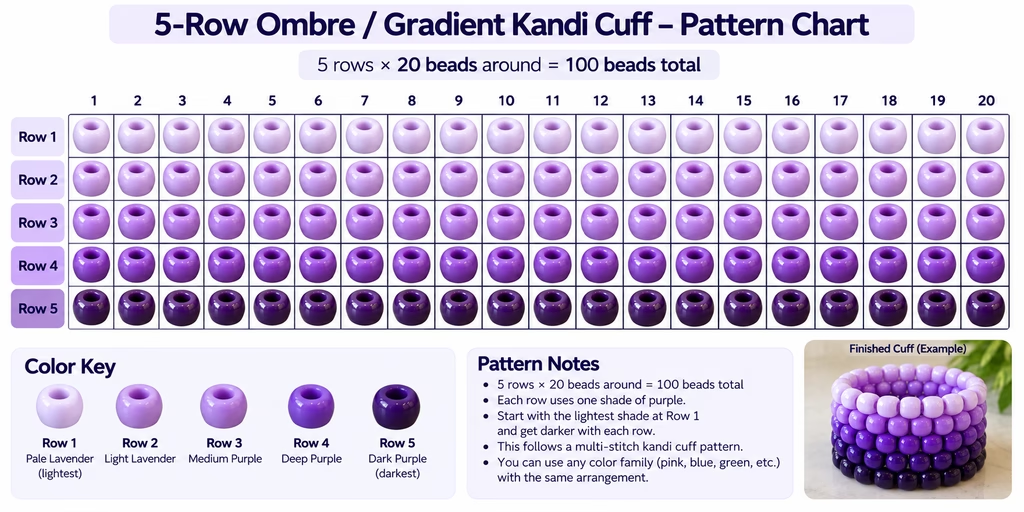
Ombre Pattern
For this version, you’ll make a 5-row cuff with 20 beads around the base, giving you approximately 100 beads total.
Each row uses one shade, moving gradually from lightest to darkest.
For example:
- Row 1: Light lavender
- Row 2: Soft purple
- Row 3: Medium purple
- Row 4: Deep violet
- Row 5: Dark purple
The result is a simple gradient that becomes darker as you move across the cuff.
Pattern Grid
Each bead represents one position in the pattern.
Tip: Choose shades that are visibly different from one another. If two shades are too similar, the gradient will be difficult to see.
How to Make It
- Cut your elastic. Leave plenty of extra cord so you have enough to finish and tie the cuff.
- String the first row. Add 20 beads in your lightest shade.
- Form the first row into a circle. Bring the ends together and secure the starting row.
- Add the second row. Use the next darker shade while weaving it into the previous row.
- Continue with rows 3, 4, and 5. Move through your color shades from lightest to darkest.
- Check the gradient. Make sure the shades progress smoothly without accidentally mixing the colors.
- Finish the cuff. Bring the ends together, secure the elastic with a strong knot, then thread the remaining cord through a few nearby beads before trimming the excess.
💡 Ombre Tip
Don’t choose five random shades. Lay your beads next to each other before you start. You should be able to see a clear progression from light → medium → dark.
Try a Different Color Family
You can make the same pattern with:
- 🌸 Light pink → dark pink
- 💙 Baby blue → navy
- 💚 Mint → forest green
- 🧡 Peach → burnt orange
- 💜 Lavender → deep violet
The fun part is that the pattern stays the same—you simply change the color family.
4. Heart Kandi Cuff

Best for: Beginners ready to try a simple picture pattern
Difficulty: Beginner–Intermediate
Rows: 6
Pattern type: Multi-stitch
Time: About 45 minutes
Approximate beads: 120
Supplies
- Pony beads in two contrasting colors
- Stretch elastic cord
- Beading or yarn needle
- Scissors
The Design

This cuff uses a simple repeating heart pattern against a contrasting background. The heart is built directly into the bead grid, so you can follow the color placement row by row rather than trying to shape the heart freehand.
For our version, we’ll use:
- 20 beads around the cuff
- 6 rows high
- 120 beads total
- A contrasting heart repeated around the cuff
Because multi-stitch cuffs use an even base row and the beads in each new row sit in the gaps of the previous row, the pattern needs to be designed to fit that structure.
How to Make It
- Cut your elastic with some extra length for tying.
- String the first 20 beads to create the base row.
- Join the row into a circle.
- Add the second row, following the heart pattern.
- Continue building the cuff one row at a time until you have 6 rows.
- Keep checking your heart motif as you work so the colors stay in the correct positions.
- Once the cuff is complete, tie the elastic securely and weave the extra cord back through nearby beads.
💡 Tip
Choose colors with strong contrast so the heart is easy to see. Red and white, pink and white, purple and pink, or black and red would all work beautifully.
5. Star or Snowflake Cuff

Best for: Seasonal designs and anyone ready for a slightly more detailed pattern
Difficulty: Intermediate
Rows: 8
Pattern type: Multi-stitch
Time: About 50 minutes
Approximate beads: 160
Supplies
- Pony beads in two or three contrasting colors
- Stretch elastic cord
- Beading or yarn needle
- Scissors
The Design

This cuff features a repeating star pattern worked into a contrasting background. The star is built from individual beads on the pattern grid, making it a fun step up from the simpler stripes, checkerboard, gradient, and heart designs.
For our version, we’ll use:
- 20 beads around the cuff
- 8 rows high
- 160 beads total
- A repeating star motif
- A dark background with bright stars so the design stands out
A grid is especially useful here because picture patterns need to be followed row by row, with each cell representing one bead.
How to Make It
- Cut your elastic with extra length for finishing.
- String the first 20 beads to create the base row.
- Join the row into a circle.
- Build the remaining rows while following the star pattern.
- Work through all 8 rows, keeping the color placement consistent.
- Check that the stars repeat evenly around the cuff.
- Tie the elastic securely and weave the excess back through nearby beads.
💡 Tip
For the clearest star shape, use strongly contrasting colors—for example, navy and white, black and silver, or purple and white.
For another fun creative activity to do with kids, you can also try these fun crafts for kids.
6. Chevron / Arrow Kandi Cuff

Best for: Beginners who want a bold geometric pattern
Difficulty: Beginner–Intermediate
Rows: 6
Pattern type: Multi-stitch
Time: About 45 minutes
Approximate beads: 120
Supplies
- Pony beads in two contrasting colors
- Stretch elastic cord
- Beading or yarn needle
- Scissors
The Design

This cuff uses a repeating chevron or arrow pattern made from alternating bead colors. The design gives the cuff a strong zigzag effect without requiring a complicated picture.
For our version, we’ll use:
- 20 beads around the cuff
- 6 rows high
- 120 beads total
- A repeating chevron pattern
- Two contrasting colors so the arrows are easy to see
Multi-stitch is particularly suitable for cuffs with pictures and geometric designs because each new row is built into the gaps of the row below.
How to Make It
- Cut your elastic with extra length for tying.
- String the first 20 beads to create the base row.
- Join the beads into a circle.
- Add the second row while following the chevron pattern.
- Continue building the remaining rows, keeping the colors in the correct positions.
- Complete all 6 rows and check that the arrows line up consistently around the cuff.
- Tie the elastic securely and weave the excess through nearby beads.
💡 Tip
Choose colors with plenty of contrast so the zigzag pattern is obvious. Black and white, pink and white, blue and yellow, or purple and white would all work nicely.
7. Simple Flower Cuff
Best for: Nature-inspired designs | Rows: About 7 | Time: About 55 minutes
A simple five-petal flower can be repeated across the cuff to create a colorful floral pattern. Try yellow centers with pink, purple, or white petals, then add green beads if you’d like to create a leafy or stem-like section.
Once you’ve made one flower, you can easily experiment with different petal colors and backgrounds.
8. Skull Cuff
Best for: Halloween or an edgier style | Rows: About 8 | Time: About 60 minutes
A simplified pixel-art skull can be surprisingly approachable. Focus on the main features—a pair of dark eye sockets, a small nose opening, and a row of teeth—rather than trying to create a highly detailed skull.
Black and white beads give you a classic look, while glow-in-the-dark beads can make the design stand out even more.
9. Character or Pixel-Art Cuff
Best for: Gamers and pop-culture fans | Rows: 8–10 | Time: About 60–75 minutes
Simple pixel-art characters translate especially well into kandi patterns because you can break the image into individual bead-sized squares.
Try a ghost, mushroom, animal, smiley face, or another small character. For a custom design, you can sketch your image on graph paper and turn each square into one bead.
10. 3D Rainbow Cuff
Best for: Crafters ready for a challenge | Rows: 6+ | Time: About 75–90 minutes
A 3D cuff adds extra beads between rows to create a raised effect. It takes more patience than a simple stripe or checkerboard cuff, but the finished bracelet has much more dimension.
If you’ve already made a few basic cuffs and want to try something different, this is a fun project to tackle next.
Tips for Making Better Kandi Cuffs
A few simple habits can save you a lot of frustration when you’re working on a pattern.
- Plan the pattern first. Sketch it on graph paper or use a digital pattern maker before threading your beads.
- Cut plenty of cord. It’s better to have extra elastic than discover you’ve run out halfway through your cuff.
- Don’t pull the rows too tightly. The finished cuff needs enough flexibility to stretch over your hand.
- Keep your colors separated. A bead tray or small containers can make counting and sorting much easier.
- Check each row as you go. Catching a misplaced bead early is much easier than taking apart several completed rows.
- Secure your final knot. Use a firm knot and weave the remaining cord through a few beads before trimming.
- Check the fit. The cuff should be comfortable and able to slide over your hand without feeling excessively tight.

Which Kandi Cuff Should You Make First?
If you’re not sure which design to choose, I’d keep it simple based on your experience level.
- Brand new to kandi: Start with the rainbow stripe.
- Ready for your first pattern: Try the checkerboard or ombré cuff.
- Want a recognizable design: Make the heart or flower cuff.
- Making something seasonal: Try the star, snowflake, or skull.
- Ready for a challenge: Move on to a character or 3D cuff.
Where to Find More Kandi Cuff Inspiration
Once you’ve made a few cuffs, you’ll probably want to experiment with your own designs. Pattern communities and social platforms can be useful for finding new ideas and seeing how other makers approach different stitches.
- Kandi Pad — browse user-created kandi patterns and find ideas for different skill levels.
- Lemon8 — look for kandi tutorials and design inspiration from other crafters.
- TikTok — search for kandi cuff tutorials when you want to see the weaving process in action.
- MakeBead — use a pattern designer to plan bead layouts from images or custom designs.
- Reddit’s r/kandi community — a place to see finished cuffs and discuss patterns with other makers.
If you enjoy relaxing, hands-on creative projects, you might also like these easy journaling ideas for beginners.
Frequently Asked Questions
What is the easiest kandi cuff pattern for beginners?
The rainbow stripe cuff is the easiest place to start because you don’t have to follow a complicated picture pattern. You can focus on learning the basic weaving technique while working with one color per row.
How many beads do I need for a kandi cuff?
The number depends on the cuff’s width, length, bead size, and pattern. A small 4-row cuff for an average adult wrist may use roughly 80–120 pony beads.
What string should I use for kandi cuffs?
Stretch elastic cord around 0.5–1 mm thick is a practical choice. Thicker cord can provide more durability, while thinner cord can be easier to thread through smaller bead holes.
Can kids make kandi cuffs?
Yes. Older children can learn the basic weaving technique with adult supervision, while younger children may need help with threading, counting, and finishing the knot.
How do I keep my kandi pattern straight?
Count the beads in each row and compare your work with the pattern before moving on. Keeping your beads sorted by color also helps prevent mistakes.
What’s the difference between a kandi cuff and a regular bracelet?
A regular stretch bracelet is usually made from a single strand of beads. A kandi cuff uses multiple rows that are woven together, creating a wider bracelet that can display larger patterns. You can learn the basics of a single-strand bracelet in our guide on how to make stretch bracelets.
Do I need a beading needle?
A flexible or collapsible beading needle can make multi-row cuffs much easier to thread. If you don’t have one, you can also stiffen the end of the elastic with a small piece of tape.
How do I finish a kandi cuff?
Once you’ve completed the cuff, tie the elastic securely, then thread the remaining tail through a few nearby beads before trimming it. This helps keep the finished knot tucked away and reduces the chance of it coming loose.

Conclusion
Kandi cuffs are a fun way to turn simple pony beads and elastic cord into colorful, wearable designs. You can start with something as simple as rainbow stripes and gradually work your way toward hearts, flowers, characters, or 3D patterns.
If you’re completely new, don’t worry about making your first cuff perfect. Focus on keeping your bead count consistent, following one row at a time, and getting comfortable with the weaving process.
Once you’ve made your first few cuffs, you’ll have a much better feel for the technique and can start creating your own patterns and color combinations.
So grab your beads, choose a pattern, and start with something simple. Your first cuff doesn’t have to be perfect—it just has to be yours.


