
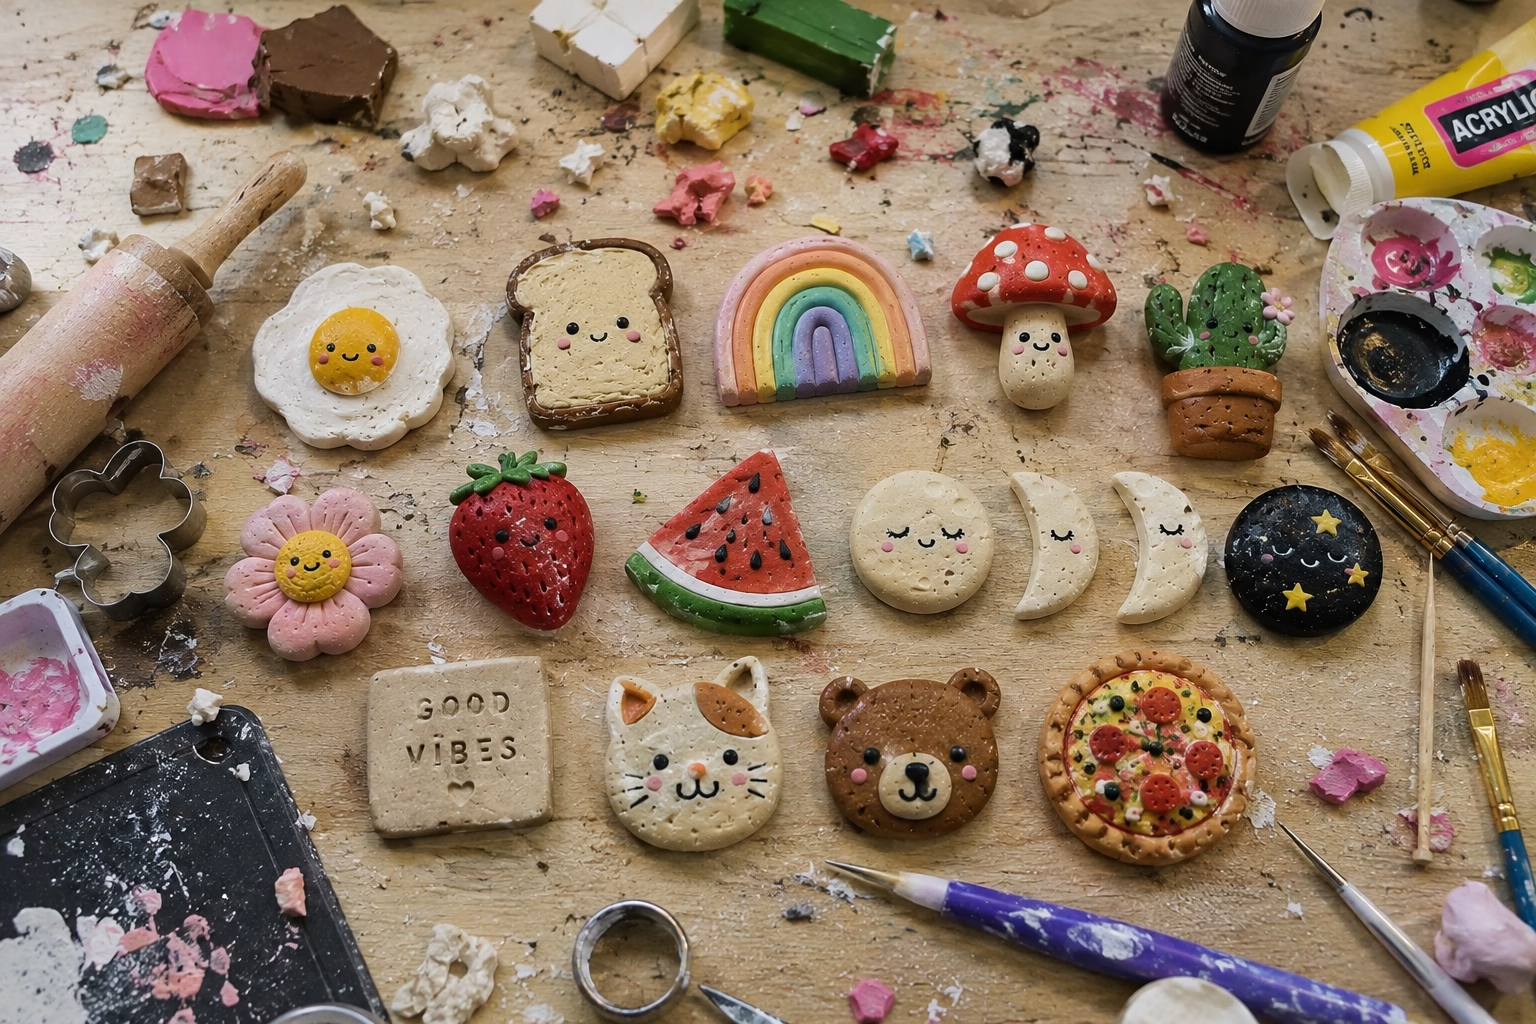
Clay magnet DIYs are such a fun little project because you don’t need much space, expensive equipment, or advanced crafting skills to make something you’ll actually want to keep.
You can make tiny breakfast foods, flowers, animals, fruit, mushrooms, moons, or even miniature versions of your favorite foods. Once the clay is shaped, painted, sealed, and fitted with a small magnet, you have a handmade decoration for your fridge or a simple gift for someone else.
I’ve put together 11 ideas ranging from very easy shapes for beginners to more detailed designs if you want a project that takes a little longer. I’ll also walk you through the materials, the basic process, and a few tips that can help your magnets hold up better over time.
Quick Answer: Clay fridge magnets are small handmade decorations made from polymer clay or air-dry clay. You shape the clay, let it bake or dry, add paint and details if needed, seal the surface, and attach a small disc magnet to the back.
For a first project, simple flowers, rainbow discs, fruit, or basic animal faces are good places to start. More detailed options include miniature food, moon phases, and stamped quote tiles.
Most projects need only clay, a rolling tool, something to cut or shape the clay, paint, sealant, and magnets.
If you enjoy our [summer crafts and DIY ideas for kids] or [awesome DIY crafts to try with your kids], this is another easy project to add to your list.
Materials You’ll Need

You don’t need a large collection of specialist tools. Most of the supplies can be reused for several batches of magnets.
| Supply | What It’s Used For |
|---|---|
| Polymer or air-dry clay | The main material |
| Rolling pin or acrylic rod | Rolling clay evenly |
| Cookie cutters or craft knife | Cutting shapes |
| Acrylic paint and brushes | Adding color and details |
| Mod Podge or clear varnish | Sealing finished pieces |
| Small disc magnets | Attaching magnets to the back |
| Strong adhesive | Securing the magnets |
A basic starter collection can cost roughly $10–$20, depending on what you already have.
Before You Start
Try to keep your clay around 3–4 mm thick for most flat magnets. Pieces that are too thin can become fragile, while very thick pieces may sit too far away from the fridge for a small magnet to hold them securely.
If you’re making these with children, air-dry clay is a convenient option because it doesn’t require oven baking.
11 Clay Magnet DIY Ideas for the Fridge

You don’t need to make complicated sculptures to get a good result. Simple shapes often look better on a fridge because they’re easy to recognize and can be made as a matching set.
1. Kawaii Breakfast Magnets
Make tiny fried eggs, toast slices, pancakes, or breakfast bowls and give them simple little faces.
Use white and yellow clay for a fried egg, or layer different colors for toast and pancakes. Once they’re finished, small painted eyes and a smile can turn basic shapes into cute little characters.
Difficulty: Easy
Good for: Beginners and kids
2. Pastel Rainbow Discs
Roll the clay flat and create thin arcs in different pastel colors.
Layer the arcs together, gently press them into place, and cut the finished piece into a circle.
You can make several different color combinations and display them together as a small collection.
Difficulty: Easy
Good for: Beginners
3. Mushrooms and Moon Motifs
Mushrooms are surprisingly simple to make. Shape a small stem, add a rounded cap, and decorate it with tiny dots.
You can also make crescent moons with little stars for a completely different look.
A matte sealer works nicely if you want the finished pieces to have a softer appearance.
Difficulty: Easy to moderate
Good for: Decorative fridge collections
4. Mini Cacti
Shape a small cactus body with two little arms, then use a toothpick to add tiny texture marks.
Paint it green and add a tiny flower if you want a little extra color.
You can make several cactus shapes in slightly different sizes so they look like a miniature collection.
Difficulty: Easy
Good for: Beginners
5. Paw-Print Magnets
For a more personal project, make a small clay disc and use a gentle paw impression to create a keepsake.
Once finished, you can paint the clay, seal it, and add a magnet to the back.
This makes a particularly meaningful gift for a pet owner.
Difficulty: Easy
Good for: Pet keepsakes and gifts
6. Layered Flower Magnets
Flower shapes are perfect for beginners because you can create them with cookie cutters or by hand.
Cut a simple flower, add a contrasting center, and layer another smaller flower on top if you want more dimension.
Try soft pink, purple, yellow, cream, or white for a simple floral collection.
Difficulty: Easy
Good for: Beginners and gifts
7. Mini Fruit Magnets
Strawberries, lemons, oranges, and watermelon slices are all good choices.
A watermelon slice, for example, can be made from a simple triangle with green around the edge, red in the middle, and tiny black seed details.
The shapes don’t need to be perfectly realistic. A few recognizable details are enough.
Difficulty: Easy
Good for: Colorful kitchen décor
8. Moon Phase Set
Create a small collection showing different moon phases.
You can make a full moon, gibbous moon, half moon, crescent, and a simple disc for the new moon.
Keep them all in the same color for a coordinated look. Cream, white, gold, or muted gray can work beautifully.
Arrange the finished pieces in a row across the fridge.
Difficulty: Easy to moderate
Good for: Matching sets and gifts
9. Stamped Quote Tiles
Roll the clay into small rectangles and press alphabet stamps into the surface before baking or drying.
Short phrases work best, such as:
- Good vibes
- Be kind
- Hello
- Love
- Home
You can paint the letters afterward in a contrasting color and seal the finished tile.
Difficulty: Moderate
Good for: Personalized gifts
10. Animal Face Magnets
Cats, bears, foxes, and other animals can be reduced to a few basic shapes.
Start with a round face, add small triangle ears, then use paint or a fine-tip marker for the eyes, nose, and other details.
These are especially fun to make with children because everyone can choose a different animal.
If you’re looking for more kid-friendly craft ideas, check out our [15 Fun Easy Camping Crafts For Kids].
Difficulty: Easy to moderate
Good for: Kids and animal lovers
11. Miniature Food Magnets
If you enjoy miniature crafts, this is where you can really have fun.
Try making tiny tacos, sushi rolls, pizzas, cakes, or other foods using several layers of clay.
They take a little more patience because of the small details, but the finished magnets can look surprisingly realistic.
If you’re making food-themed magnets, you could turn the project into a full creative afternoon by making [guacamole and tortilla chips] afterward.
Difficulty: Moderate
Good for: Older kids and adults
How to Make Clay Magnets

Once you’ve chosen a design, the actual process is fairly straightforward.
1. Condition the Clay
Knead the clay until it becomes soft and flexible.
With polymer clay, this usually takes a couple of minutes. If you’re using air-dry clay, follow the instructions on the package because different brands can behave differently.
2. Roll the Clay
Place the clay on a smooth surface and roll it to an even thickness.
For flat magnets, around 3–4 mm works well.
3. Cut or Shape Your Design
Use cookie cutters for simple shapes, a craft knife for more precise designs, or your hands for small sculpted pieces.
4. Add Your Details
This is where you can add texture, stamped letters, tiny dots, facial features, seeds, petals, or other decorations.
Toothpicks and small clay tools can be useful for tiny details.
5. Bake or Dry
If you’re using polymer clay, follow the temperature and baking time listed on your clay package.
Air-dry clay does not go in the oven. Allow it to dry completely according to the manufacturer’s instructions.
6. Paint
Once the clay is fully cool or dry, add acrylic paint where needed.
For tiny details, a small brush or fine-tip paint pen can make the job easier.
7. Seal the Surface
Apply a thin coat of Mod Podge or clear varnish and allow it to dry.
Add another thin coat if needed.
A sealer helps protect painted surfaces from everyday handling and moisture.
8. Attach the Magnet
Apply a small amount of strong adhesive to the back of the finished piece and press the disc magnet firmly into place.
Let the adhesive cure completely before putting the magnet on your fridge.
If you’re using a strong adhesive such as E6000, work in a well-ventilated area and follow the product’s instructions.
Tips for Making Your Clay Magnets Last
A few small details can make a big difference in how your finished magnets hold up.
Keep the Clay Even
Very thin pieces can crack more easily. For flat magnets, keeping the clay around 3–4 mm thick gives you a good balance between durability and weight.
Don’t Rush the Drying or Baking
Make sure polymer clay is fully baked and air-dry clay is completely hardened before painting.
Painting or sealing clay that isn’t ready can affect the final finish.
Use Thin Coats of Sealer
Two thin coats generally work better than one very thick coat. Allow the first coat to dry before adding the next.
Choose a Strong Magnet
Small neodymium disc magnets can provide more holding strength than basic ceramic magnets.
For heavier pieces, choose the magnet size based on the weight of the finished clay piece.
Give the Adhesive Time to Cure
Don’t immediately put a newly glued magnet on the fridge.
Let the adhesive cure according to the product instructions so the magnet has a better chance of staying attached.
Clay Magnets Make Great Gifts
One of the best things about these little projects is that you can make several at once.
Create a matching set of flowers for a friend, animal faces for children, miniature food for someone who loves cooking, or a moon-phase set for a thoughtful handmade gift.
You can also package four or six matching magnets together rather than giving away just one.
If you’re planning a creative activity day, clay magnets can easily fit alongside a [kids’ summer bucket list] or another craft project.
For more projects around the home, take a look at our [DIY home decor ideas].
Frequently Asked Questions
What type of clay is best for fridge magnets?
Polymer clay is a popular option because it becomes hard and durable after baking and works well for detailed designs.
Air-dry clay is another good choice, particularly when you don’t want to use an oven. It can be a little more fragile once dry.
Do I need to bake air-dry clay?
No. Air-dry clay hardens at room temperature. Follow the drying time recommended on the package.
Polymer clay, on the other hand, needs to be baked according to the manufacturer’s instructions.
What size magnet should I use?
Small disc magnets around 10–12 mm can work well for lightweight pieces.
Heavier or thicker magnets may need a larger disc or more than one magnet.
Can kids make clay magnets?
Yes, with appropriate supervision.
Air-dry clay can be particularly convenient for younger children because there is no oven step. Older children can work with polymer clay with adult help when baking is required.
How can I prevent air-dry clay from cracking?
Allow it to dry slowly and follow the manufacturer’s instructions.
Avoid placing freshly shaped pieces directly beside strong heat sources or in direct sunlight.
Can I use Mod Podge as a sealer?
Yes. Mod Podge can be used to seal painted clay and is available in finishes such as matte and gloss.
Apply thin coats and allow each one to dry before adding another.
How long do clay magnets last?
A well-made magnet can last for years when the clay is properly cured, the surface is sealed, and the magnet is securely attached.
The painted surface is usually the part that needs the most protection from scratching and everyday handling.
Can I sell handmade clay magnets?
Yes. Handmade magnets can work well as small gifts or craft-market products, particularly when sold in themed sets.
Personalized designs can also make a set more appealing.
What’s the easiest design for a beginner?
I’d start with a flower, rainbow disc, fruit slice, or simple animal face.
These designs use basic shapes and don’t require much sculpting experience.
Conclusion

Clay magnets are a simple way to turn a small amount of clay into something personal for your kitchen, office, or gift box.
You don’t need to start with complicated miniature sculptures. Pick an easy shape such as a flower, rainbow, fruit slice, or animal face and get comfortable with the basic process first.
Once you’ve got the hang of rolling, cutting, painting, sealing, and attaching the magnet, you can move on to more detailed designs such as miniature foods, moon phases, or personalized quote tiles.
My biggest tip is to keep your first project simple and enjoy the process. Handmade pieces don’t have to look perfectly identical to be charming. In fact, tiny differences between each magnet are part of what makes a handmade set special.
Gather your clay, choose a design, and make a few magnets that actually feel like yours.
For more creative inspiration, explore our [summer crafts and DIY ideas for kids], [DIY home decor ideas], and other easy projects you can make at home.


