
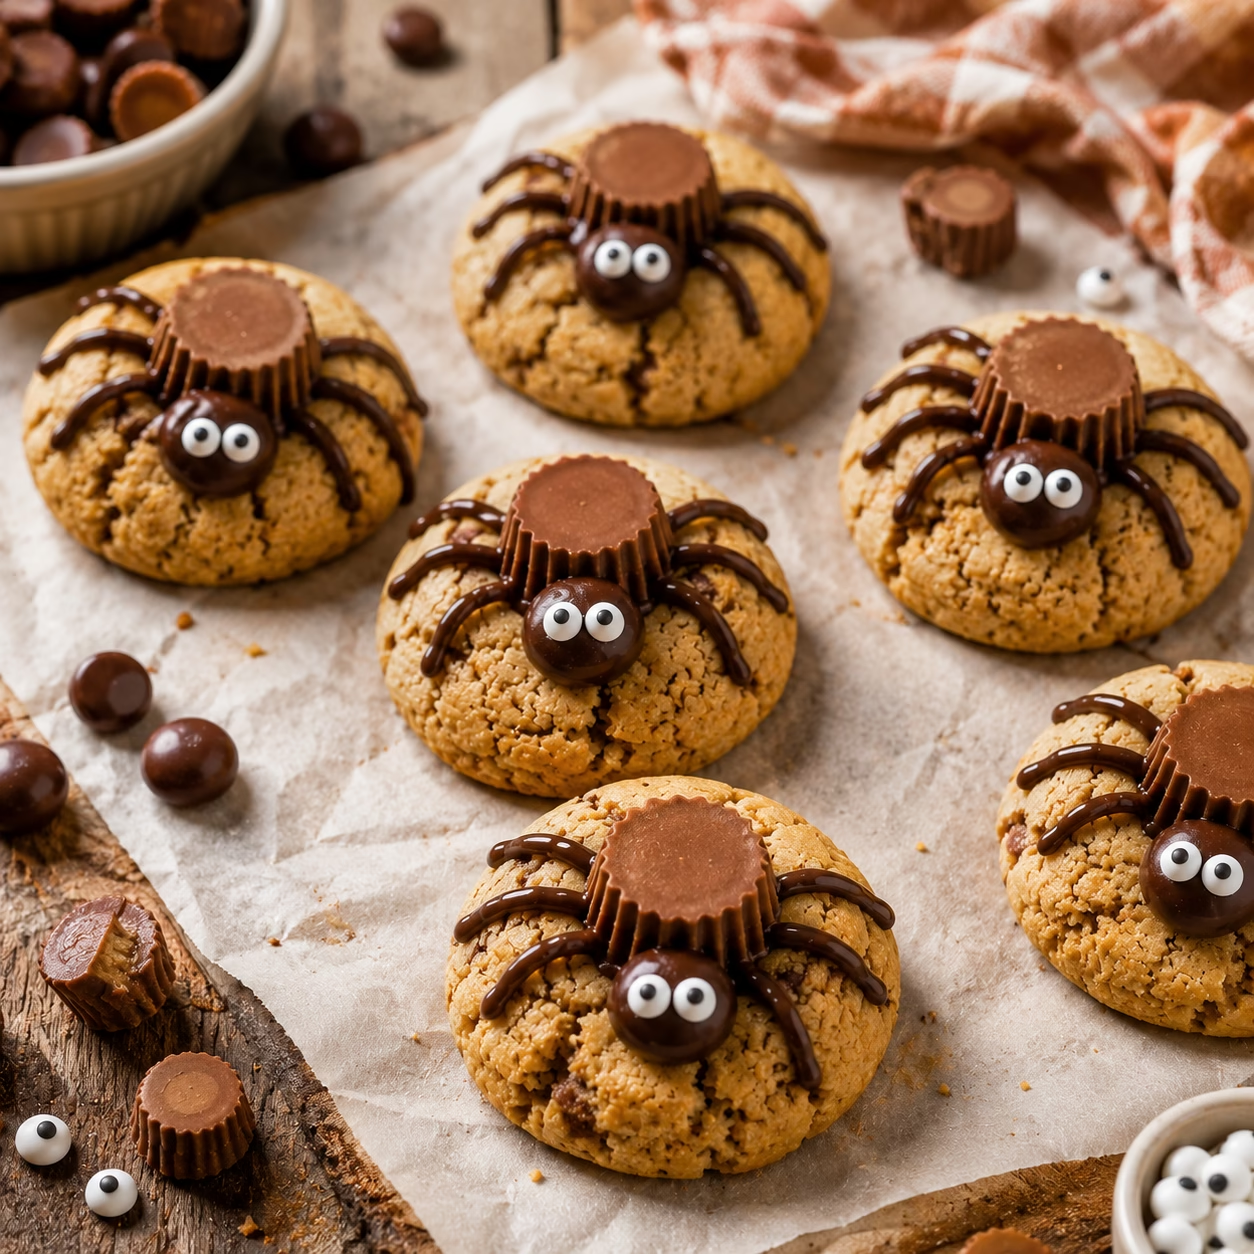
Quick Answer: Peanut Butter Spider Cookies are soft peanut butter cookies decorated with a mini peanut butter cup body, a smaller chocolate candy head, piped chocolate legs, and candy eyes. The recipe uses a simple 3-ingredient peanut butter cookie dough made with peanut butter, sugar, and egg.
The cookies are baked at 350°F (175°C) for about 10 minutes, then decorated while the cookies are still warm. Freezing the chocolate candies before baking helps them hold their shape when they’re pressed into the warm cookies.
❤️ Why You’ll Love These Peanut Butter Spider Cookies
- Easy 3-ingredient cookie base: Peanut butter, sugar, and egg create the dough.
- Perfect for Halloween: Chocolate candies and piped legs turn ordinary cookies into spiders.
- Fun to decorate: Kids can help with the candy eyes and chocolate legs once the cookies have cooled.
- No flour needed: The basic dough doesn’t require wheat flour.
- Easy to customize: Change the candy, chocolate, or decorations to create different spider designs.
- Make-ahead friendly: The dough can be refrigerated for up to 3 days before baking.
- Great for Halloween parties: The finished cookies make a fun addition to a spooky dessert table.
These Peanut Butter Spider Cookies combine a soft, chewy peanut butter cookie with chocolate candies arranged to look like a spider.
The large mini peanut butter cup forms the spider’s body, a smaller chocolate candy becomes the head, and melted chocolate is piped into eight legs. Two candy eyeballs complete the spooky design.
The cookie itself is intentionally sturdy enough to support the chocolate decorations without falling apart, making these a fun Halloween baking project as well as an easy party dessert.
For a plant-based peanut butter cookie option, try our Vegan Peanut Butter Cookies.
Ingredients You’ll Need

Peanut Butter Cookie Base
- 1 cup (250 g) creamy peanut butter
- 1 cup (200 g) granulated sugar
- 1 large egg
Spider Decorations
- 24 mini peanut butter cups
- 24 mini chocolate candies, for the heads
- ½ cup (85 g) melted chocolate chips
- 48 candy eyeballs
Choose the Right Peanut Butter
The original recipe recommends a commercial, shelf-stable creamy peanut butter such as Jif or Skippy.
These types of peanut butter contain stabilizers that help prevent oil separation and produce a thicker dough that holds its shape during baking.
Natural peanut butter can separate and produce a greasy dough. If natural peanut butter is all you have, the original draft recommends refrigerating the dough for 30 minutes before baking.
Equipment You’ll Need
- Large mixing bowl
- Whisk or sturdy spoon
- Baking sheet
- Parchment paper
- Small microwave-safe bowl
- Piping bag or zip-top bag
- Small knife or scissors
- Wire cooling rack, optional
How to Make Peanut Butter Spider Cookies

1. Preheat the Oven
Preheat your oven to 350°F (175°C).
Line a baking sheet with parchment paper.
2. Make the Peanut Butter Dough
Add the peanut butter, granulated sugar, and egg to a bowl.
Whisk until a thick, sticky dough forms.
3. Shape the Cookies
Roll the dough into 1-inch (2.5 cm) balls.
Place the balls on the prepared baking sheet, leaving enough space between them for spreading.
4. Bake
Bake for about 10 minutes, until the edges are golden and the centers are just set.
5. Add the Spider Body
Remove the cookies from the oven.
Immediately press one frozen mini peanut butter cup into the center of each warm cookie.
6. Add the Spider Head
Press a smaller chocolate candy slightly above the peanut butter cup to create the spider’s head.
7. Cool the Cookies
Allow the cookies to cool completely on the baking sheet.
This gives the chocolate decorations time to adhere to the cookie base.
8. Pipe the Chocolate Legs
Transfer the melted chocolate to a piping bag or small zip-top bag with the corner snipped off.
Pipe eight legs, with four extending from each side of the candy body.
9. Add the Eyes
Attach two candy eyeballs to the chocolate head using a small dab of melted chocolate.
Let the chocolate set before serving.
Tips for the Best Peanut Butter Spider Cookies
Freeze the Chocolate Candies
Keep the mini peanut butter cups in the freezer before baking.
The original recipe emphasizes freezing the candies because it helps them maintain their shape when they’re pressed into the warm cookies.
Use Commercial Creamy Peanut Butter
Commercial creamy peanut butter gives you a more stable dough.
Natural peanut butter can separate and make the dough greasy or cause it to spread too much.
Add the Candy Immediately
Press the peanut butter cups into the cookies right after removing them from the oven.
The warm cookie gives the candy enough softness and adhesion to stay in place.
Don’t Add the Chocolate Legs While the Cookies Are Warm
Let the cookies cool completely before piping the legs.
If the cookie is still warm, the chocolate can melt and run off the edges.
Pipe Four Legs on Each Side
For a recognizable spider shape, pipe four legs from each side of the candy body.
Curve them slightly outward for a more natural spider-like appearance.
Storage & Make-Ahead
Room Temperature
Store the finished cookies in an airtight container at room temperature for up to 5 days.
The chocolate decorations should remain stable under normal room-temperature conditions.
Warm Climates
If your kitchen is very warm, the chocolate legs may soften.
The original draft recommends refrigerating the cookies in warmer conditions and allowing them to sit at room temperature for about 15 minutes before serving.
Make the Dough Ahead
The cookie dough can be prepared ahead and refrigerated for up to 3 days.
Let the dough sit at room temperature for about 10 minutes before rolling so it is easier to work with.
Variations

Egg-Free Peanut Butter Spider Cookies
Replace the egg with a flax egg.
Mix 1 tablespoon (7 g) ground flaxseed with 3 tablespoons (45 ml) water, then let it sit for about 5 minutes until thickened before adding it to the peanut butter and sugar.
For another egg-free option, try our Vegan Chocolate Chip Cookies.
Peanut Butter Spider Cookies With Chocolate Legs
Use semi-sweet or dark chocolate chips for the legs.
Melt the chocolate in 20-second microwave intervals, stirring between each interval until smooth. Transfer it to a piping bag or zip-top bag and pipe four legs on each side of the spider.
For another rich chocolate cookie, try our Chocolate Brownie Cookies.
Gluten-Free Peanut Butter Spider Cookies
The basic 3-ingredient peanut butter cookie base is naturally gluten-free because it contains no wheat flour.
However, check the labels on your chocolate candies, peanut butter cups, candy eyes, and other decorations to make sure they are suitable for your needs.
For a breakfast option with similar flavors, try our Date Peanut Butter Chocolate Smoothie.
No-Bake Peanut Butter Spider Cookies
The original draft suggests using a pre-baked cookie or graham cracker as the base.
Another option is to form the peanut butter mixture into small flat discs, freeze them for about 20 minutes, then add the candy decorations and pipe the chocolate legs.
Peanut Butter Spider Cookies for Kids
These cookies make a fun hands-on Halloween baking project.
Children can help roll the dough, unwrap the candies, add the eyes, and decorate the cooled cookies. An adult should handle the hot baking sheet and melted chocolate.
For another family-friendly cookie project, try our Carrot Cake Cookies.
FAQ
What Is the Best Peanut Butter for Spider Cookies?
Commercial, shelf-stable creamy peanut butter is recommended.
Jif and Skippy are given as examples because their stabilizers help prevent oil separation and produce a thicker dough.
Can I Use Natural Peanut Butter?
It isn’t recommended for the recipe as written because natural peanut butter can separate and create a greasy dough.
If you only have natural peanut butter, refrigerate the dough for about 30 minutes before baking.
Can I Make Peanut Butter Spider Cookies Without Eggs?
Yes.
Use a flax egg or another suitable egg replacer. For a flax egg, combine 1 tablespoon ground flaxseed with 3 tablespoons water and let it thicken for 5 minutes.
How Do I Keep the Spider Bodies From Melting?
Freeze the mini peanut butter cups for at least 30 minutes before baking.
Then press them into the cookies immediately after removing the cookies from the oven rather than baking the candies directly in the dough.
Why Are My Chocolate Legs Melting?
The cookies were probably still warm when you piped the chocolate.
Allow the cookies to cool completely before adding the chocolate legs.
How Long Do Peanut Butter Spider Cookies Last?
They can last up to 5 days in an airtight container at room temperature.
If your kitchen is very warm, refrigerate them to keep the chocolate decorations firm.
Do Peanut Butter Spider Cookies Need to Be Refrigerated?
No, not normally.
Store them at room temperature in an airtight container. Refrigerate only if your kitchen is particularly warm and the chocolate decorations need to stay firm.
Are Peanut Butter Spider Cookies Gluten-Free?
The basic 3-ingredient cookie base is naturally gluten-free.
However, you need to verify that your chocolate candies, peanut butter cups, candy eyeballs, and other decorations are gluten-free.
Conclusion
Peanut Butter Spider Cookies turn a simple 3-ingredient peanut butter cookie into a fun Halloween dessert with just a few chocolate decorations.
For the best results, freeze the mini peanut butter cups, press them into the warm cookies immediately after baking, and wait until the cookies are completely cool before piping the chocolate legs.
They’re easy enough for a family baking project but festive enough for Halloween parties and dessert tables.
Peanut Butter Spider Cookies
Ingredients
Cookie Base
- 1 cup 250 g creamy peanut butter
- 1 cup 200 g granulated sugar
- 1 large egg
Decorations
- 24 mini peanut butter cups
- 24 mini chocolate candies
- ½ cup 85 g melted chocolate chips
- 48 candy eyeballs
Instructions
- Preheat oven to 350°F (175°C) and line a baking sheet with parchment paper.
- Whisk peanut butter, sugar, and egg until a thick, sticky dough forms.
- Roll into 1-inch (2.5 cm) balls and place on the baking sheet.
- Bake for about 10 minutes, until the edges are golden and centers are just set.
- Immediately press one frozen mini peanut butter cup into the center of each warm cookie.
- Press one smaller chocolate candy slightly above each peanut butter cup to form the head.
- Allow cookies to cool completely.
- Transfer melted chocolate to a piping bag and pipe four legs on each side of the spider.
- Attach two candy eyeballs to each head with a small dab of melted chocolate.
- Let the decorations set before serving.
Notes
Commercial creamy peanut butter is recommended.
Natural peanut butter can make the dough greasy.
Add the candy bodies immediately after baking.
Cool cookies completely before piping chocolate legs.
Pipe four legs on each side for eight total.
Store in an airtight container for up to 5 days.
Refrigerate only in very warm conditions.
Refrigerated dough can be stored for up to 3 days.


