
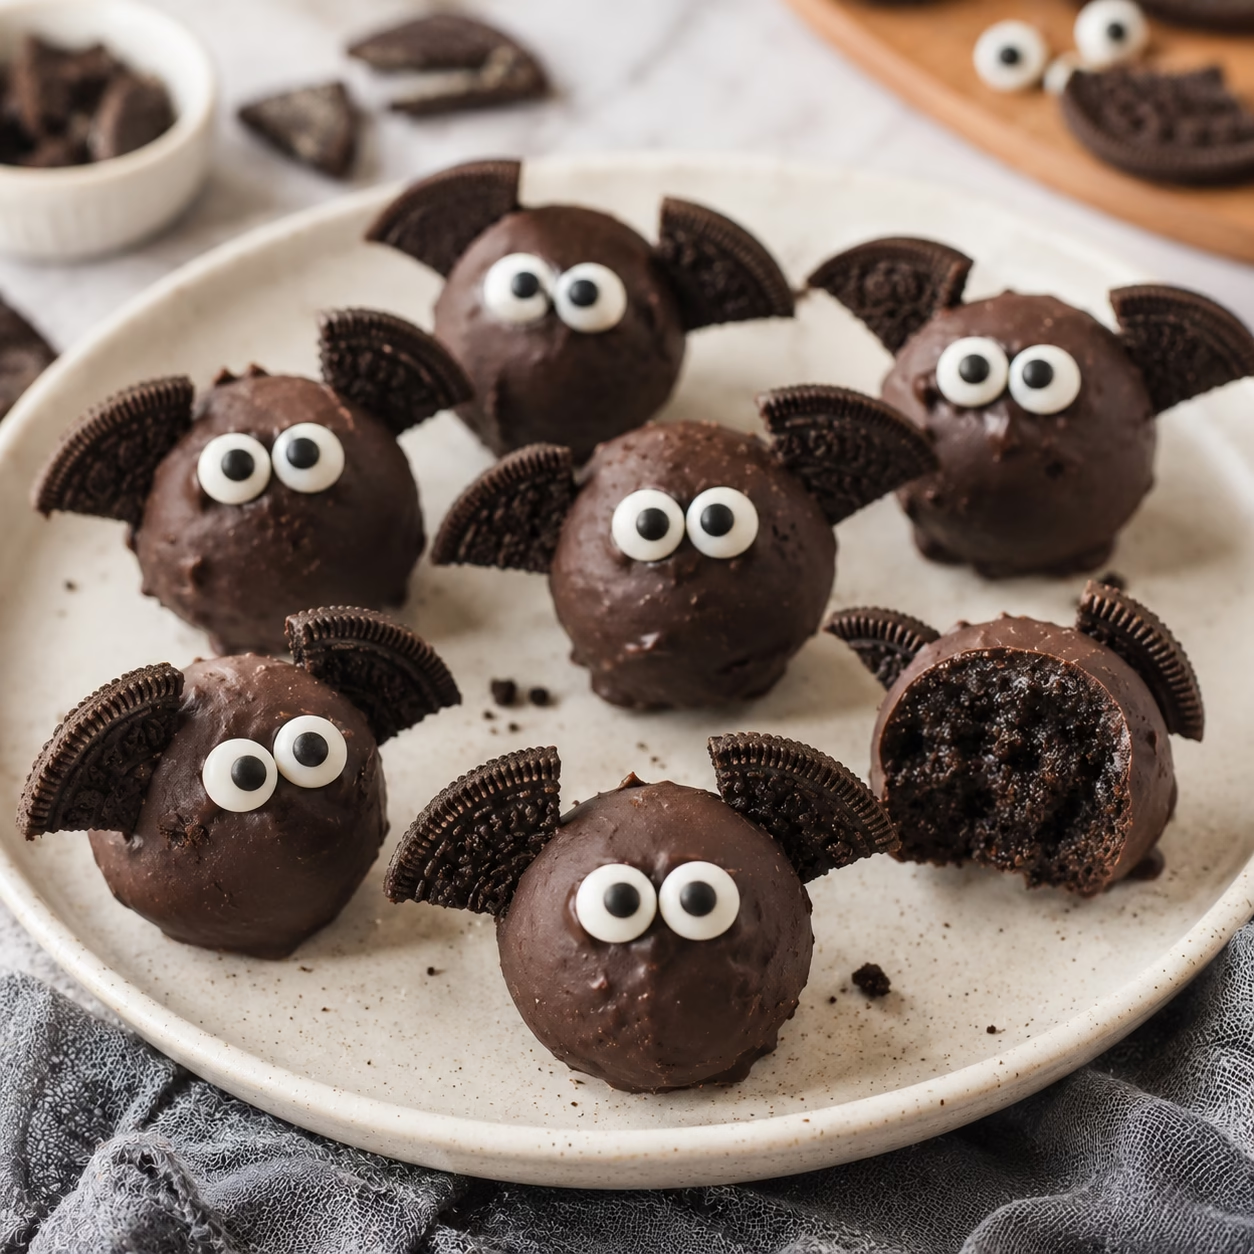
Quick Answer: Spooky Bat Oreo Cookie Balls are easy no-bake Halloween treats made with crushed Oreo cookies and cream cheese, shaped into bite-sized balls, coated in melted chocolate, and decorated with Oreo cookie wings and spooky eyes. They take about 30 minutes of active prep time and are perfect for Halloween parties and fall gatherings.
❤️ Why You’ll Love This Recipe
- No baking required, so they’re easy to make.
- Perfect for Halloween parties and fall gatherings.
- Made with just five main ingredients.
- The Oreo wings give them a fun bat shape.
- Freezing the shaped balls for 10 minutes helps them hold together during dipping.
- They can be prepared ahead and stored in the refrigerator.
- The recipe can easily be adapted with plant-based cream cheese and dairy-free chocolate.
These Spooky Bat Oreo Cookie Balls turn classic Oreo truffles into a fun Halloween treat. The base is made from crushed Oreo cookies and softened cream cheese, then shaped into small balls and coated in melted chocolate. Oreo cookie halves become the wings, while white icing and miniature chocolate chips create the spooky eyes.
The recipe is simple enough for beginner bakers but looks especially festive once decorated. The key is keeping the truffle balls cold before dipping and attaching the wings while the chocolate coating is still tacky so everything stays securely in place.
Ingredients You’ll Need

- 18 Oreo cookies, divided – 9 cookies are crushed for the truffle mixture, while the remaining 9 are halved to create the bat wings.
- 4 oz (113 g) brick cream cheese, softened – Combines with the cookie crumbs to create a firm, creamy truffle mixture.
- 4 oz (113 g) semi-sweet baking chocolate – Creates the smooth chocolate coating around each cookie ball.
- 2 tablespoons (15 g) miniature semi-sweet chocolate chips – Used as the pupils for the bat eyes.
- 1 tablespoon (15 g) white decorating icing – Creates the spooky eyes.
Equipment You’ll Need
- Rimmed baking sheet
- Waxed paper
- 12 lollipop sticks
- Zip-top bag
- Rolling pin or food processor
- Mixing bowl
- Spatula
- Microwave-safe bowl
- Fork or dipping tool
How to Make Spooky Bat Oreo Cookie Balls

1. Crush the Cookies
Place 9 Oreo cookies in a zip-top bag and crush them finely with a rolling pin until they resemble coarse sand. Transfer the crumbs to a medium bowl.
Break the remaining 9 Oreo cookies in half and set them aside for the bat wings.
2. Make the Cookie Mixture
Add the softened cream cheese to the crushed Oreo crumbs. Mix with a spatula until the mixture is evenly combined and forms a thick dough.
3. Shape the Cookie Balls
Roll the mixture into 12 evenly sized 1-inch balls.
4. Add the Lollipop Sticks
Dip one end of each lollipop stick into a small amount of melted chocolate. Insert the chocolate-coated end into the center of each cookie ball and place them on a waxed-paper-lined baking sheet.
5. Chill the Cookie Balls
Freeze the shaped cookie balls for 10 minutes. This firms up the cream cheese mixture and helps prevent the balls from sliding off the sticks when they’re dipped into the chocolate.
6. Coat the Cookie Balls
Dip each chilled ball into the remaining melted chocolate, turning gently to coat it evenly. Tap the stick lightly against the bowl to remove excess chocolate, then return the coated ball to the baking sheet.
7. Add the Bat Wings
Trim a small piece from one end of each reserved Oreo half to create a flat edge. Dip the flat edge into melted chocolate and press it against the side of the coated cookie ball. Hold it in place for a few seconds until the chocolate begins to set.
8. Add the Eyes
Once the chocolate has set, use white decorating icing to create two eyes on each bat. Press miniature chocolate chips into the icing for the pupils.
Tips
- Chill before dipping: Don’t skip the 10-minute freeze. The chilled cookie balls are much easier to dip without falling apart.
- Melt the chocolate gently: Heat it in short intervals and stir between each one to prevent it from becoming too thick or seizing.
- Attach the wings immediately: The chocolate should still be tacky when you add the Oreo wings so they have something to stick to.
- Use melted chocolate as glue: A small amount on the flat edge of each cookie wing helps secure it to the truffle.
- Let the coating set before adding the eyes: This keeps the white icing from melting or running.
Storage & Make-Ahead
Refrigerator
Store the finished Bat Oreo Cookie Balls in an airtight container in the refrigerator for up to 2 weeks. Keep them flat so the cookie wings and icing aren’t crushed. Let them sit at room temperature for about 10 minutes before serving.
Freezer
Freeze the cookie balls for up to 3 months. Freeze them flat on a baking sheet until solid, then transfer them to a freezer-safe container to prevent sticking. Thaw overnight in the refrigerator before serving.
Easy Variations

Golden Oreo Bat Truffles
Replace the regular Oreos with Golden Oreos for a vanilla-flavored version while keeping the same cream cheese truffle method.
White Chocolate Bats
Use white candy melts instead of semi-sweet chocolate for pale, ghostly-looking bats. Use dark decorating icing for the eyes to create contrast.
Peanut Butter Bat Truffles
Add 2 tablespoons (32 g) peanut butter to the Oreo and cream cheese mixture for a richer, nuttier center.
Halloween Sprinkle Bats
Replace the smooth chocolate finish with orange and black Halloween sprinkles for a colorful, textured coating.
What to Serve With
These Bat Oreo Cookie Balls are perfect alongside other Halloween and party treats, such as:
- Halloween sugar cookies
- Thanksgiving cheese balls
- Chocolate-covered pretzels
- Brownie bites
- Halloween cupcakes
- Hot chocolate
- Apple cider
- Coffee
For a savory party option, try our 8 Best Thanksgiving Cheese Balls Recipes. For another easy dessert, our Strawberry Cheesecake Dip is a quick option. You can also try our Funfetti Summer Cookies for another colorful cookie treat.
FAQ
What makes the wings stick to the Oreo balls?
Melted chocolate acts as the edible glue. Dip the flat edge of each Oreo half into melted chocolate and press it against the wet coating of the truffle. Hold it in place briefly until the chocolate begins to set.
Do I have to use lollipop sticks?
No. You can serve the Oreo balls as traditional truffles without sticks. However, the sticks make dipping and decorating the bats much easier.
Can I use regular frosting instead of decorating icing?
Yes, although decorating icing in a tube gives you better control when making the small bat eyes. Regular frosting may be softer and more difficult to use for detailed decorations.
How do I crush the Oreos finely?
Place the cookies in a sealed plastic bag and crush them with a rolling pin. You can also pulse them in a food processor until they reach a fine, sand-like consistency.
Can I use milk chocolate instead of semi-sweet chocolate?
Yes. Milk chocolate works well and creates a sweeter coating that pairs nicely with the Oreo cookie flavor.
Can I make Bat Oreo Cookie Balls without chocolate?
Yes, although the exposed Oreo and cream cheese mixture will be stickier. You can roll the balls in crushed Oreo crumbs or cocoa powder instead.
Are Bat Oreo Cookie Balls vegan?
The original recipe isn’t vegan because it contains cream cheese and semi-sweet baking chocolate. To adapt it, use plant-based cream cheese and dairy-free chocolate. Always check the labels of your cookies and other ingredients.
How long do Bat Oreo Cookie Balls last?
They can be refrigerated in an airtight container for up to 2 weeks. Because the recipe contains cream cheese, they should remain refrigerated when not being served.
Conclusion
Spooky Bat Oreo Cookie Balls are a fun, no-bake Halloween dessert that turns simple Oreo truffles into adorable little bats. With a creamy cookie-filled center, smooth chocolate coating, and Oreo wings, they make an impressive party treat without requiring complicated baking skills. Chill the cookie balls properly, attach the wings while the chocolate is tacky, and you’ll have a festive dessert that’s ready for your next Halloween gathering.
Save this recipe on Pinterest so you have it ready when Halloween treats are on the menu


