
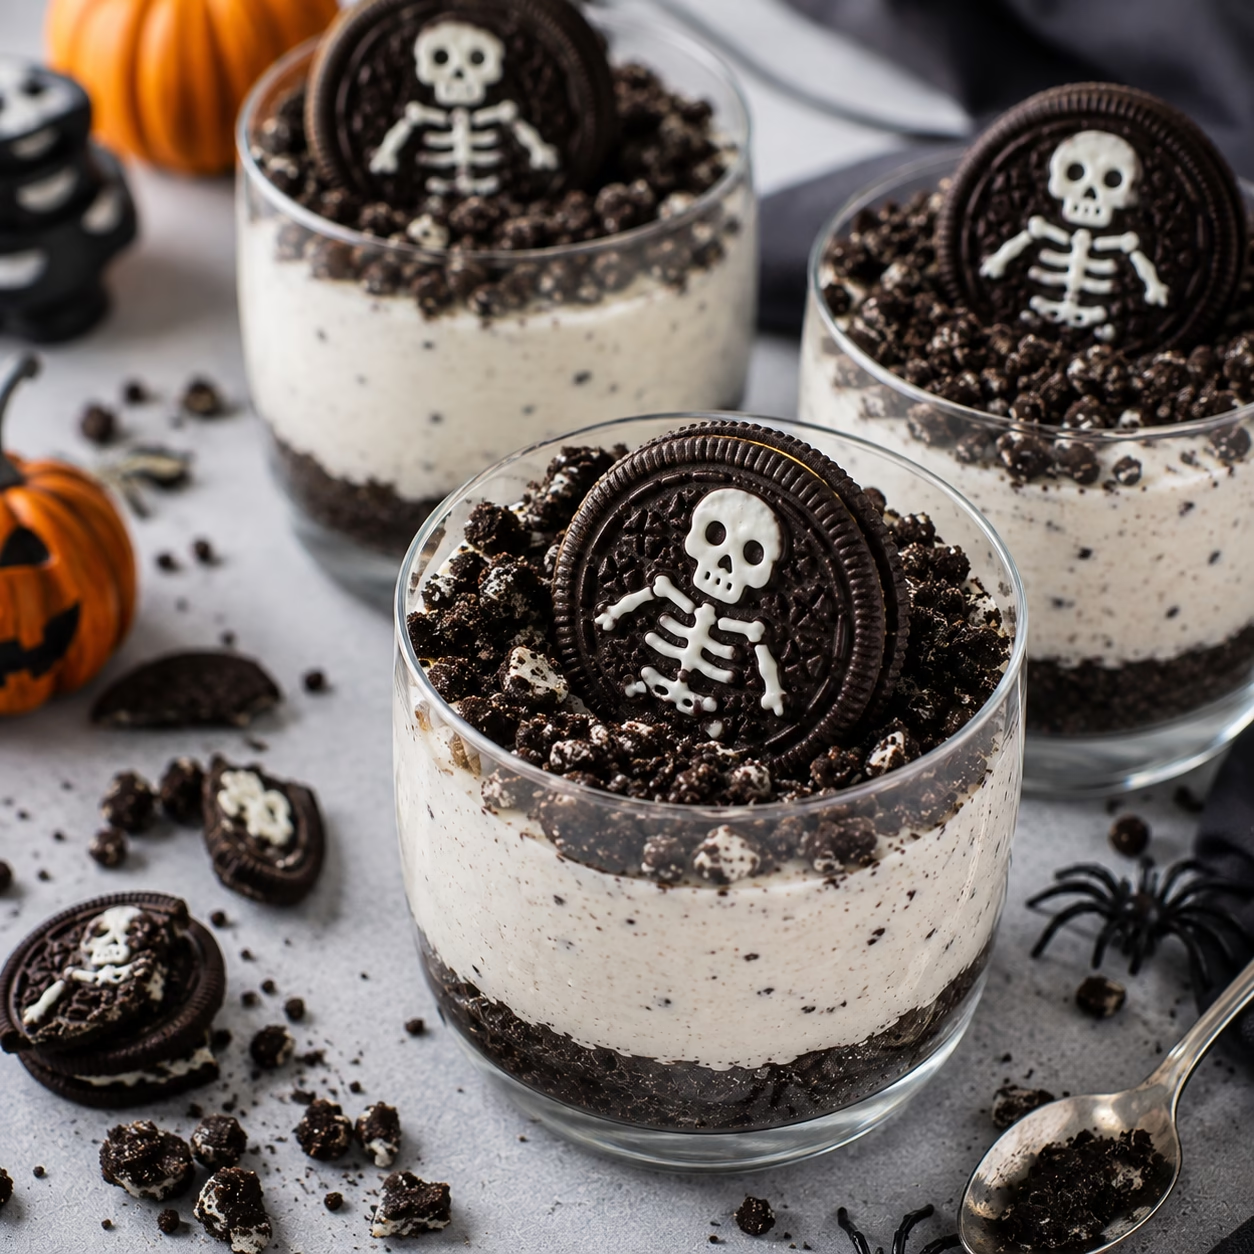
Quick Answer: These Spooky Skeleton Oreos Halloween Dessert Cups are an easy no-bake Halloween treat made with a crushed Oreo crust and a light cream cheese filling, then topped with skeleton-themed Oreos.
The active preparation takes about 20 minutes, followed by at least 4 hours of chilling, and the recipe makes 4–6 servings.
You can use seasonal Skeleton Oreos when they’re available or regular Oreos if you can’t find them.
❤️ Why You’ll Love This Spooky Halloween Dessert
- No baking required: You can make the entire dessert without turning on the oven.
- Quick to prepare: The active prep takes only about 20 minutes.
- Perfect for Halloween: Skeleton Oreos instantly give the dessert a spooky look.
- Easy individual servings: Dessert cups make serving simple at parties.
- Simple ingredients: The filling uses cream cheese, heavy cream, sugar, and vanilla.
- Make-ahead friendly: You can prepare the cups ahead and refrigerate them until serving.
- Easy to customize: Use regular Oreos, Mint Oreos, or add your own Halloween decorations.
If you’re looking for an easy Halloween dessert that looks festive without requiring a lot of decorating, these Spooky Skeleton Oreos dessert cups are a great choice.
The recipe starts with crushed Oreos mixed with melted butter to create a simple cookie crust. A creamy mixture of softened cream cheese, sugar, whipped cream, and vanilla is then layered over the crust and chilled until firm. Each cup is finished with a whole Skeleton Oreo for a simple Halloween presentation.
For another easy individual dessert, try our No Bake Peach Dessert Cups Recipe.
Ingredients You’ll Need

- 14 Spooky Skeleton Oreos, or regular Oreos, about 154 g
- 2 tablespoons (28 g) unsalted butter, melted
- 8 ounces (226 g) cream cheese, softened
- ¼ cup (50 g) granulated sugar
- 1 cup (240 ml) heavy whipping cream, cold
- 1 teaspoon (5 ml) vanilla extract
- 6 whole Oreos, for decoration
Skeleton Oreos or Regular Oreos?
Skeleton Oreos are seasonal Halloween cookies with skeleton designs stamped into the chocolate wafers. They are useful here mainly because of their appearance.
If you can’t find them, regular Oreos work perfectly in this recipe. You can even decorate regular Oreos yourself with icing to create a skeleton design.
Equipment You’ll Need
- Zip-top bag
- Rolling pin
- Mixing bowls
- Electric mixer or whisk
- Spatula
- Measuring cups and spoons
- 4–6 serving glasses
- Piping bag, optional
How to Make Spooky Skeleton Oreos Halloween Dessert

1. Crush the Oreos
Place the 14 Oreos in a zip-top bag.
Use a rolling pin to crush them into fine crumbs.
2. Make the Oreo Crust
Add the melted butter to the cookie crumbs.
Mix until the crumbs are evenly coated and have the texture of wet sand.
3. Divide the Crust
Divide the Oreo mixture evenly between 4–6 serving glasses.
Press the crumbs firmly into the bottom of each glass to create an even crust.
4. Make the Cream Cheese Filling
Beat the softened cream cheese and granulated sugar until completely smooth.
Scrape down the sides of the bowl as needed to remove any lumps.
5. Whip the Cream
In a separate bowl, combine the cold heavy whipping cream and vanilla extract.
Whip until stiff peaks form, about 3–4 minutes.
6. Fold the Mixtures Together
Gently fold the whipped cream into the cream cheese mixture.
Continue folding until the filling is smooth and there are no visible white streaks.
7. Fill the Dessert Cups
Pipe or spoon the cream cheese filling over the prepared Oreo crusts.
Divide it evenly between the glasses.
8. Chill
Refrigerate the dessert cups for at least 4 hours, or until the filling is firm.
Don’t skip this step because the chilling time allows the no-bake filling to set properly.
9. Decorate and Serve
Place one whole Skeleton Oreo on top of each dessert just before serving.
You can add additional Halloween decorations if desired.
Tips for the Best Skeleton Oreo Dessert
Soften the Cream Cheese
Let the cream cheese come to room temperature naturally before mixing.
Softened cream cheese creates a smoother filling and makes it easier to combine with the sugar.
Keep the Heavy Cream Cold
Unlike the cream cheese, the heavy whipping cream should stay refrigerated until you’re ready to whip it.
Cold cream whips better and helps create a stable, airy filling.
Fold Gently
Don’t vigorously stir the whipped cream into the cream cheese mixture.
Fold gently with a spatula to avoid knocking the air out of the whipped cream.
Give It Enough Time to Chill
The dessert needs at least 4 hours in the refrigerator.
If you serve it too early, the filling may still be loose and soupy instead of firm.
Keep the Decorations Simple
A whole Skeleton Oreo on top is enough to create the Halloween look.
For more decoration, use white chocolate, icing, candy eyeballs, or extra crushed Oreos.
Storage & Freezing
Refrigerator
Store the finished dessert cups in an airtight container in the refrigerator for up to 3 days.
The Oreo crust may soften slightly over time, but the dessert will remain enjoyable.
Make Ahead
These dessert cups can be made up to 2 days ahead.
Keep them covered in the refrigerator and add delicate decorations close to serving time.
Freezer
The desserts can be frozen for up to 1 month.
Wrap each cup tightly in plastic wrap and place it in a freezer-safe bag.
Thaw overnight in the refrigerator before serving.
Variations

Chocolate Lovers Version
Use Golden Oreos for the crust and add 2 tablespoons cocoa powder to the filling for a richer chocolate flavor.
Mint Oreo Dessert Cups
Use Mint Oreos for a cool mint flavor.
Peanut Butter Version
The original draft lists peanut butter as a variation, but simply replacing all of the cream cheese would change the structure of the filling. For a more reliable variation, peanut butter can be incorporated into the cream cheese filling rather than replacing the cream cheese entirely.
Skeleton Oreo Cheesecake
Turn the individual cups into a full-size no-bake cheesecake.
Triple the ingredient quantities, press the crust into a 9-inch (23 cm) springform pan, add the filling, and refrigerate for at least 6 hours, preferably overnight.
For another cheesecake-inspired dessert, see our Strawberry Crunch Cheesecake Tacos Recipe.
Oreo Dirt Cups
Layer chocolate pudding and crushed Oreos in clear cups, then place a Skeleton Oreo upright in the center.
For another portion-controlled dessert, try our No Bake Peach Dessert Cups Recipe.
Halloween Dessert Board
Arrange whole Skeleton Oreos, Halloween candy, and our Strawberry Cheesecake Dip on a large platter.
For a larger fall dessert spread, add our 10 Easy Thanksgiving Fall Cupcakes Ideas.
FAQ
What Are Spooky Skeleton Oreos?
Skeleton Oreos are seasonal Halloween versions of Oreo cookies featuring skeleton designs stamped into the chocolate wafers.
When Do Spooky Skeleton Oreos Come Out?
The draft states that they typically appear in stores in late August or early September and remain available through October.
Because seasonal availability can vary, check current stores when shopping.
Do Skeleton Oreos Taste Different From Regular Oreos?
The draft states that they taste nearly identical to regular Oreos, with possible differences depending on the specific seasonal flavor release.
Can I Use Regular Oreos Instead of Skeleton Oreos?
Yes.
Regular Oreos work perfectly for both the crust and decoration. You can draw skeleton faces on them with icing if you want the spooky appearance.
How Long Does This Skeleton Oreo Dessert Take to Make?
Active preparation takes about 20 minutes, but the dessert needs at least 4 hours of chilling before serving.
Can I Make This Dessert Ahead of Time?
Yes.
The draft says you can make it up to 2 days ahead and keep it covered in the refrigerator.
Why Is My Filling Runny?
The most likely causes are warm heavy cream, improperly softened cream cheese, over-mixing, or insufficient chilling.
Keep the cream cold until whipping, soften the cream cheese at room temperature, fold gently, and refrigerate for the full 4 hours.
Conclusion
These Spooky Skeleton Oreos Halloween Dessert Cups are an easy way to make a Halloween dessert that looks much more complicated than it really is.
With a crunchy Oreo crust, creamy no-bake filling, and spooky cookie topping, they are perfect for Halloween parties, dessert tables, and make-ahead entertaining.
The most important things are to use softened cream cheese, keep the heavy cream cold, fold gently, and give the dessert at least 4 hours to chill.
Spooky Skeleton Oreos Halloween Dessert
Ingredients
- 14 Spooky Skeleton Oreos or regular Oreos about 154 g
- 2 tablespoons 28 g unsalted butter, melted
- 8 oz 226 g cream cheese, softened
- ¼ cup 50 g granulated sugar
- 1 cup 240 ml heavy whipping cream, cold
- 1 teaspoon 5 ml vanilla extract
- 6 whole Oreos for decoration
Instructions
- Place 14 Oreos in a zip-top bag and crush into fine crumbs.
- Mix the crumbs with melted butter until they resemble wet sand.
- Divide the crust between 4–6 serving glasses and press firmly into the bottoms.
- Beat softened cream cheese and sugar until completely smooth.
- Whip cold heavy cream and vanilla until stiff peaks form, about 3–4 minutes.
- Gently fold the whipped cream into the cream cheese mixture.
- Spoon or pipe the filling over the Oreo crusts.
- Refrigerate for at least 4 hours, until firm.
- Top each dessert with a whole Skeleton Oreo before serving.
Notes
Keep the cream cheese softened but the heavy cream cold.
Fold gently to preserve the whipped cream’s volume.
Chill for at least 4 hours.
Refrigerate for up to 3 days.
Freeze for up to 1 month.
Thaw frozen desserts overnight in the refrigerator.
Add delicate decorations just before serving.


